I decided on two sites for my digital portfolio--about.me and vizualize.me. I checked out several sites for this project, and found these two the easiest to use. I had trouble finding a single site that provided everything I was looking for, so I chose simplicity in my presentation. I initially wanted the ability to embed videos and other elements, have room for text, photos, etc. I found it difficult finding a site that allowed me to embed HTML code outside of the Google Sites, and I wanted to try something new, so I settled on about.me for my main page, and also created a link to my vizualize.me. Below is a screenshot of my homepage. I initially used the HTML code provided by about.me to embed into Blogger, but it changed the layout, so I chose to include a hyperlink instead (below).
My greatest internal debate with this project was deciding how much I really wanted to share. For example, I did not link my Facebook as this is a personal site for me. I even debated putting on my resume, however, I figure if people wanted to access information about me, there were already many sources, as evidenced in our Digital Dossier task! I then debated who I was truly marketing to with this assignment. Was it my students, my students' parents, or fellow educators with similar curriculum. Also, with a marketing background, I know the value in continually promoting myself, as I constantly fear that Business Education will be phased out of schools. Therefore, this site would be a great tool for networking purposes and job opportunities, should the need arise. It was with that realization I chose to include my formal resume. I included several links to sites I've used in the past several years, as well as my school website which has a lot of information about my classes and student exemplars. This is a great opportunity to take all of the different pieces of technology we've gathered and created through the years, and give them a home base! Hope you enjoy!!
One major thing to note
here, as Steve Dembo, my professor, pointed out…..TEST, TEST, TEST, AND TEST MORE!! I spent several days testing and the night
before my webinar, I still wasn’t satistfied!!
Lol!!
When given this assignment, I will admit, I was nervous. It's one thing to invite people into your classroom (aka--comfort zone), but to broadcast yourself to the world is a whole separate matter. Especially when you're live, and you can't edit out the mistakes. In addition, I decided to broadcast my entire 6th grade class, and well, you just never know what a 6th grader is going to do or say!! So, I thought this was a great opportunity to challenge myself and try something new!
Getting Ready:
It took a while
to find a free site that I liked to use for my broadcast. I ended choosing Livestream.
After creating an account, I set up my webcam and microphone with ease, and began testing a live feed. This was the easy part. The hard part, initially, was deciding how to share this with others. I asked some students and parents to test the link a few days before our scheduled show. In my first go around, parents and other viewers had to create an account in order to access our videos. The other issue was the videos, as I was not able to get a live feed. We recorded clips, then posted them to a blog of sorts, then the participants could watch them. While I like the "archived nature" of this, I wanted a live feed and a direct link where participants did not have to create an account to view us.
Click here to view one of my Test Sessions (seen above), but know
you'll have to create an account to see it (case in point).
Then, I realized I could download a live version of Livestream broadcasting, and with this, participants just had to click a link to connect directly to our broadcast!! I tested the link with coworkers in my building, in other buildings, and with my family members to be sure they could all simply click on our link and see us live. This being establishing, I told my students to tell their parents about our show, I posted the link onto my Homework Hotline Website, I emailed staff, friends, parents, and relatives the direct link, and I made a bunch of phone calls. We were ready and the kids were excited!
Our Class Webinar:
I picked my 6th grade class because we were in the middle of an Internet & Social Networking Safety Unit. In the classes leading to our broadcast, I shared statistics with my students, then had my 6th graders take a Google Form Survey so we could see immediate results on what was happening with our own kids. We talked about recent cases where kids were getting in trouble with improper usage of social media sites, texting, and online "relationships". I felt this would be a great topic for the parents to hear, and appropriate content for our first Webinar. I took the chance of not rehearsing anything with the students ahead of time as far as Webinar content. I did, however, want them to share our survey results, so I printed out each question and the results and handed them out to the kids. This way, I could involve several kids in the discussion and they could speak pressure-free as they had something to say. At the end of the broadcast, we had the option to save our recording.
(If the above embedded video isn't working, click here to view our archived Webinar.)
Reflection:
This was a GREAT experience!! The kids loved participating and I loved allowing them the opportunity to share their content online. We were so excited when people started appearing in our chat room, especially the parents who joined us! It was great for the kids to see that people were watching, listening and participating. As participants commented on the survey results, I realized this is a great way to educate parents and community, as well as the kids. I really liked how Livestream allowed me to save the video at the end. This way, I could post the video on my website for more parents to view if they were not able to attend live. Also, the kids loved that they could watch the video later.
In the future I realized a few things. First, if I use this type of format again, where the only video seen is us and the only communication is in a chat format, I would designate someone to be in charge of the keyboard to respond more efficiently to the participants. I was trying to facilitate the session on video and respond on keyboard, and it was too much.
Also, I would like to run a Webinar where participants are also seen via Webcam. Christopher McCaffrey, the Instructional Technology Coach for my school district, watched our Webinar and stopped in to see me later in the week to provide feedback. He recommended using Google Hangouts for a future Webinar, enabling all participants to be seen and heard. With this technique, participants need a Google+ account, which is something they would need to create ahead of time. At Wilson School District, all staff and students are using Google, so this would be a great way to connect our two Middle Schools in a future live discussion. I suppose it depends on the purpose of the Webinar....I will use Livestream again when the focus is to share out, and I will use a Google Hangout when the focus is to collaborate.
I am excited to conduct another Webinar, and so are the kids!!
I initially had trouble
finding a Webinar that was being streamed at a time that worked for me, that
had applicable content for my subject-matter, and that I didn’t have to pay for
a subscription to view. I finally I
found edweb.net and signed up for Game-Based Learning which was aired from
4-5 pm on Mon, Dec. 2.
Easy to sign up and easy
to log on. I was signed in about 20
minutes ahead of time, and thought it was great that a representative from the
site came on 15 minutes early to say hi, do a sound check, welcome
everyone. She asked if anyone was new,
and I chatted that I was, and was kind of excited to see her and hear her say,
“hi Kristi, welcome”! I noticed all the
participants joining and saw people from all over the US as well as other
countries and cities like Romania, Ecuador, and Rome. I’ve often thought this, but suddenly the
point was truly driven home, that this is the future of education. I truly see traditional schools becoming more
hybrids in our virtual world. The
session promptly began at 4 pm when Jeff from Hershey, PA introduced himself and
began his session. I liked how I could
see him speaking and also see his computer screen. He showed slides, videos, and charts. It was also engaging to read the stream in
chat area and to also participate. The
hour flew by.
Pros/Strengths:
I truly believe people
can find a free Webinar on anything. I
was able to interact live via a chat room.
I was not connected via webcam or audio, but I actually found this as a
plus because I could focus on the instructor and not what everyone else was
doing. Also, I felt comfortable taking
notes during the process. At the end, two instructors came on to conduct Q
& A addressing questions from the chat throughout the session. I thought this was great.
Cons/Weaknesses:
The content was not
quite what I was expecting. The show was
literally using “Off-the-Shelf” games in the classroom, such as SKYRIM, Assassins Creed III, Bioshock
Infinite, and World of Warcraft. Being a High school History teacher, Jeff is
able to incorporate this into his curriculum and justify it with Bloom’s
Taxonomy and 21st Century Learning Skills. For example, Jeff has kids conduct population
statistics in SKYRIM to see if the
characters can sustain life with available food during the Mid Evil time
period. With Bioshock Infinite, students analyze Social Darwinism in the
Futuristic society. Students write
essays about the impact and influence of race and gender in the game World of War Craft. While this was very interesting to hear,
there is NO WAY my school district would approve these games in my middle
school classroom! I thought the content
would be how to create games to be used in the classroom. Also, my previous pro is also a con regarding
the fact that I, as a participant, could not be seen or heard. While I liked that I was at a comfort level
to take notes and could focus on the presenter, I also feel not being seen can
takes away from accountability and participation. For example, I caught myself thinking of my
to-do list for the evening a few times!
Incorporation
in the Classroom as Attendee:
I like this type of
webinar for my middle school students, if it was shorter. The hour would not hold their attention,
especially if they can wander off without being “caught” because there is no webcam on them. This is a great way to add enrichment to my
curriculum—allowing students to find a topic and further their knowledge. I see many benefits for my Career Concepts
class, such as connecting with businesses, entrepreneurs, and even learning
concepts. The format of my show, with
only the instructor being seen, is great if I want the kids to pull information
for further learning, especially since they can take notes at their discretion. For students to collaborate ideas, however, I
feel a 2-way web cam experience would be even better for them for
accountability and interaction as they share ideas and hear others. I love how the entire webinar is archived for later viewing, as is the chat log and presentation slides. This is great for students to refer to and as a teacher, I could log on and verify via the chat log if my students were active participants.
Incorporation
in the Classroom as Broadcaster:
Webinars would be a
great way for the kids to share out what they are learning and connect with
parents and local communities, which gave me the idea for my own classroom
Webinar experience, as seen in my next blog post!
Yes, I will definitely
use this in the future with my kids!!!
I LOVED this challenge!!! Photo editing is one of my favorite tasks to do on the computer, and I loved having the starting point of a daily idea from the site Project Life 365.
In addition to taking a photo for the daily theme, I found myself looking deeper into the meaning of the task, and even trying to be a little abstract in my photos and my ideas. Reflecting on the picture and justifying its connection would be a great activity for my students. I would really like to complete this same kind of week-long immersion with my students and really push the reflective aspect of this project. This would be a great way to introduce design elements,patterns and textures, etc, by giving one challenge per day. The students could evaluate each other's photos and it could even become a class challenge. I will definitely use this in the future.
Example of Pattern
Example of Texture
This is also a great opportunity for photo editing. Students could be challenged to use editing from apps like BeFunky, Photo Editor, or Tadaa if they are using their smart phones to take pictures. They could justify why they chose the particular effect to create or enhance the mood or emotion. I found editing my photos to be part of the fun of the project.
BeFunky
Tadaa
Photo Editor
Finally, it was so easy to work with the smartphone and upload pics right to my Blogger Post using the Blogger App. Students could work on this at school or at home. Again, I LOVED this project!!
Admission....I have resisted using Twitter up to this point. I had to create an account in a past course and Tweet a few things and follow my classmates, but that was it. I entered this not understanding the world of Twitter, not understanding hashtags, and very resistant to learn. That is why I forced myself to undertake this challenge.
Below you will find my log of the seven days. My favorite thing about this project was finding really cool things to share with my students to generate discussion in class. Also, some great resources to use in the future. The greatest challenge was just finding time on Friday and Sunday to pay attention to Twitter, as they were busy days from start to finish. If it weren't for having a smartphone, I don't know how I'd always have time to "immerse" myself. I will continue to use Twitter primarily for education and school connections. Still resisting using it for personal sharing, but I love having access to the resources provided.
I can see the value in using Twitter with students, but I don't think I could get all of my parents on board teaching Middle School. I always poll my classes to see what social networking they are actively using, and I still have many students whose parents do not allow access to these sites. I think I will benefit more from using something like Edmodo with my students, but I will continue to check out Twitter for my own professional development.
Day 1: Logged into my account, followed lots of people and organizations, never thought I could Tweet 6 times a day. What could I possibly Tweet about? Already annoyed by Donald Trump (thought he would be an interesting entrepreneur to follow), but still following. Went to see who it was suggested I follow, and picked several people. Then searched categories for ideas of who to follow. Also, went into settings so I had to approve followers--still not so sure.
Day 2: Realized retweeting articles for my students (well, future students...not sure how incorporating this into middle school will work yet), and using hashtags. I'm starting to get it, and realizing they allow for my students to find my tweets quickly. Also searching hashtags to see what others with my same thoughts are posting. My favorite so far is #lifeofateacher. Realizing that strange people are requesting to follow me--not sure I want to be so public yet, and wondering if they're finding me because of hashtags or who I'm following. Hmmmm. A little annoyed with Wall Street Journal--can't see their full articles unless I login or subscribe--they might have the same fate as Donald. I'll wait a few days. Got my first "Favorite"!
Very excited. Also, shared info learned with my Career Concepts students. We study entrepreneurs--lots of cool info. Found a cool article on 100 Best Websites for Entrepreneurs.
Day 3: Still enjoying Twitter. Actually Tweeted some personal things deciding it doesn't ALL have to be educational. Decided to learn a few things. FINALLY understand hashtag and its concept as a searchable term. Searched for one I keep using to connect with others--#lifeofateacher. Now I know I can follow what others are saying with the same hashtag and find people with the same interests.
Also learned how hashtags are now being used for advertising to get people to spread positive press on Twitter. Virgin America put #nerdbird on its new plane for this purpose.
Photo above is screenshot from the video tutorial below.
Day 4: Finding more resources today!! Like this great Edmondo cheat sheet that I am going to check out for this week's project:
Also, great compliment today!!....Several of my colleagues are paying attention to my Twitter and replying to my posts!! Very cool. Today, Chris McCaffrey, our Instructional Technology Coach, is paying attention!! Also, as he is implementing our district's first 1:1 initiative, I was excited to follow my school's 1:1 Twitter page!!
Day 5: This is my admission day...It's Friday, I took a personal day off of work to go to the settlement of my grandfather's house, then visit my daughter's school, then spend the day with mom as we all felt the bitter-sweet emotions of selling the family homestead, then time with friends at happy hour, then time with hubby relaxing. Made the realization last Friday night that I didn't even really look at Twitter. In fact, didn't even do my photo of the day project and suddenly grateful for the capabilities of my smart phone. I quickly checked out Twitter to find articles beneficial for my curriculum to retweet, downloaded the Blogger App to complete my entry for the day on my phone, searched for my photo of the day topic, took and edited my picture, posted my photo blog entry, and added to this Twitter blog entry...and I didn't even have to get out of bed to do any of it! Loving technology at the moment--good night!
Day 6: One of my favorite followings on Twitter = Edudemic, "Connecting Education and Technology" (screen shot below). Great article on the power of infographics!! I think I like this site so much because most information they share is in an infographic format, so it comes as no surprise that they would post and article about the power of presenting information in this way. Click here for a great example of their presenting social media shortcuts through the use of infographics.
Wanted to try something different today, so signed up for Tweetdeck. Talk about Social Immersion!! As if keeping track of one list wasn't enough, now I can watch multiple ones at the same time. I can see my life getting lost in Twitter! lol!! I'll be honest, this is too much for me--I am a bit overstimulated right now. However, if there are a few favorite followings on Twitter accounts, and people want a quick snapshot of just those account feeds, versus all, I can see the value in this tool.
Day 7: A busy day for soccer mom, but 6 tweets later....I am glad I took this challenge!! Found some GREAT resources throughout this, and will continue to do so. Feeling like a #twitterfan!
Today, my daughter's soccer team won first place in their tournament, and last week they won first place in playoffs for the season. Very proud mom moment.....and all possible due to the teamwork and hard work of the girls as they strategically "relayed" the ball!!
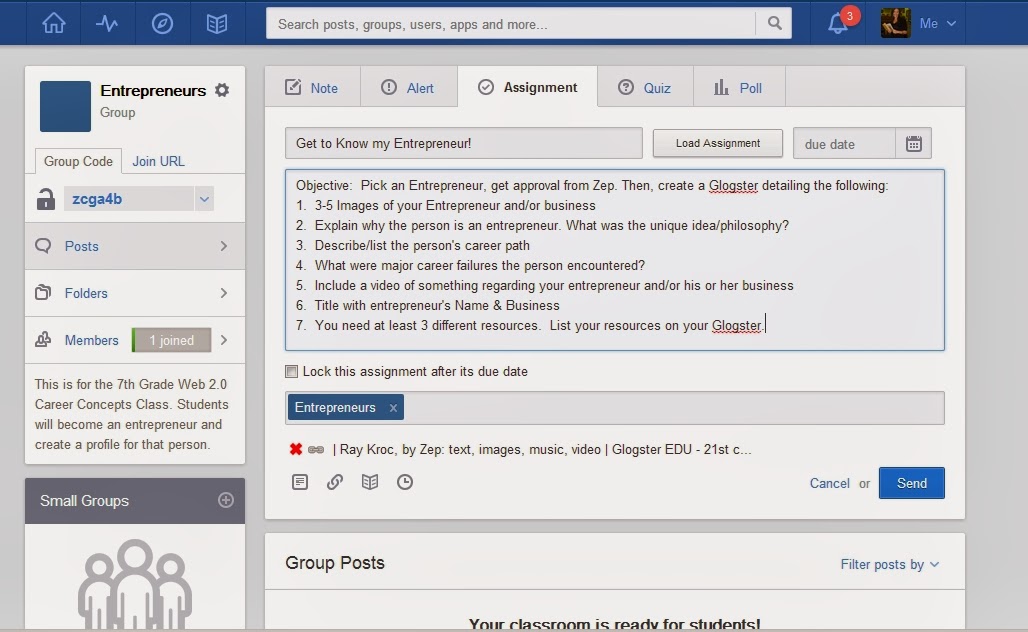
The following lesson is for my 7th Grade Web 2.0 Career Concepts class. I feel an age-appropriate social networking experience could be achieved through edmodo.com. This way, students could get the posting experience and also learn how to appropriately respond, communicate and collaborate with classmates, while still under my "watchful eye". A lesson I have had since the creation of the course is studying Entrepreneurs and what makes them so successful. I feel this would be a great opportunity to incorporate social networking and the kids could learn about many entrepreneurs instead of just one!
Entrepreneur Lesson
Goal
Using Edmodo and it's collaborative features, students will learn about various entrepreneurs and how to interact and collaborate using social media.
Objectives
Through the use of a Social Networking Site, students will learn and share information about a chosen entrepreneur. This will include the following:
Good/Service Created
Biography, Personal Background
Career History
Famous Quote or Saying
Successes and Failures
Questions about other Entrepreneurs
Videos/Photos/Audio/Web 2.0 Sites to Enhance Learning
Instructions
1. Join Mrs. Zep's Entrepreneur Group on edmodo.com: Group code = zcga4b
2. Students will choose an Entrepreneur, and make a post with their person and why they want to research this person. Classmates will respond to two other student posts with a question and a compliment.
3. Students will complete Assignment #1--the Glogster.
4. Next, students will embed their Glogsters in a Post, and all classmates will evaluate at least 5 classmates' Glogsters with comments and questions. Students are all expected to reply back.
5. Students will complete a Blabberized Entrepreneur with Quote. This is Assignment #2 in Edmodo.
Click here for Mrs. Zep's Sample Blabberized Kroc.
Students will embed or link their Blabberized characters in a Post, and all classmates will respond to at least 2 classmates' posts. Student responses should include why they think that quote is significant. Students are expected to reply back.
6. Mrs. Zep will Post multiple links for the students to read throughout the course to simulate a "Twitter Feed". Students will pick one of the posted sites, and they will complete a Reading Prompt in a Google Doc summarizing the post, and also responding to why they think it's important. They will share the prompt with a classmate and allow for commenting for peer editing before submission.
7. Each Students will Be Responsible for Posting 3 links to articles and/or videos pertaining to Entrepreneurs throughout the lesson time, and commenting on at least two other classmates' posts.
**Grading:
Glogster Grade--50 pts. Glogster Response Grade--10 pts. (2 pts. per response)
Blabberize Grade--15 pts. (5 pts. for working link, 5 pts. for image, 5 pts. for narration) Blabberize Response Grade--4 pts. (2 pts. per response) Reading Prompt Grade--30 pts.
Posts--15 pts. (5 pts. per post--any topic about entrepreneurs will count) Post Response Grade--4 pts. (2 per response)
Profile Update--2 pts. (This is a "freebie"--Students need to fill in some info.) **Rubrics are linked, and all rubrics are from Kathy Schrock's Guide to Everything. Total Unit Grade: 130 pts.
In fourth grade she came bouncing over to my classroom, the most outgoing girl in the school, to seek me out to exchange pictures. Me, the shyest kid, and that was the moment Jessica Prutzman and I became the best of friends. If anyone who knows me just read me describe myself as shy, they would think I am a liar, but I give Jessica all the credit in the world for pulling me out of my shell (well, before the Bonanno gene kicked in completely) and together we have gone through it all. Still do. Ready to celebrate our 40th birthdays in a few months, I am blessed and grateful to have this special person in my life. LYLAS Prutz!
Thought I'd try to throw some emotion into this one...no particular reason, no particular thought, just thinking back to all the times in my life where I had no sense of direction. We've all had those low points, and those hills to climb, and we know as life moves on that everything serves a purpose. But when in those low places, we often get lost in ourselves,which is what I wanted to portray here.
This question was very appropriate, and sad, for me today, because today I had to say goodbye to the place in my life that always brought me instant "peace"--my grandparents' home. My photo is of my grandfather's machine shop, which he built on his property when he came home from World War II. My grandmother always told the story how she saved money for him to buy suits to get a job when he got home, and he took the money and went and bought second-hand lumber to begin his project. The shop was originally built for my grandfather and his brother, the "racer", to work on their stock cars. After the stock car phase was over, he began to build his business and his "collection". My grandfather was a machinist by trade, leaving high school for an apprenticeship at the local textiles. He was the smartest man I ever knew, and my grandmother the strongest woman. Having living through the depression, there was nothing they couldn't overcome, and nothing they ever took for granted, including each other. They were married for 70 years. Their home, including my grandfather's shop, was my sanctuary. The place where no matter what was happening, suddenly everything was ok thanks to their welcoming arms and insightful words. Two years after my grandfather's death (my grandmother 5 years before him), our family finally sold their home, and tomorrow is settlement. Today, I had to go and say goodbye to my place of "peace".
Ok, so this is not normally my ride...but it was today. My car is getting inspected so today I got to use our pickup. I always feel a little out of my element when I drive my husband's work truck, like I'm pretending to be someone else. I don't know if it's because I have to step up into it, or all the tools inside (which I am completely clueless about), or just that I feel like if I'm driving it I should be towing a boat (which I wish I was, I once towed a 20 foot boat all the way home from Key West). Regardless, it was my ride today.
I chose this pic for two reasons...the chair and the dog. This chair (one of 4) represents my first upholstery project ever. After taking out a thousand staples (resulting in many blisters and sore fingers) I picked out this "Line" material and recovered our chairs. I felt like Martha Stewart (I've always been more a "Tool Time Girl" than Martha). I was really proud of this project, and found a love for re-purposing--a hobby I plan to spend more time on in the future. Ok, the dog....this is Sniffy, our 8-year-old Shitzu that my daughter named when she was 3. Sniffy looks cute, but attacks often. She attacks us, often. This is her morning spot--on the "lines", and our morning routine involves her growing at me when it's time to go into her cage. You can see, she's got the look, she's ready to pounce. And so the morning begins....Sniffy and the "Lines".
Without a Storyboard to begin, I decided to take my phone one day at school and begin capturing pictures and videos. I used the camera of my iPhone to capture Video and Images. I then decided to make use of my Vine account, and also captured some video with Vine. I wasn't sure how to handle my actual story and script, so I decided to simply prop up my phone at my desk, and speak from the heart. Finally, I recorded an audio file of my voice using my iPhone's Voice Memo App for an added multimedia feature for my film.
Uploading on the phone:
I went right to my WeVideo App on my iPhone to upload all of my files into a new video. (I was not able to upload my audio file, so it had to be emailed from my phone to my Gmail account, then downloaded to the computer, then uploaded into WeVideo later when logged onto the computer.) I have to say, capturing files using my phone was very easy and very handy, and the ability to upload them right away to WeVideo on the phone was very handy. I know my students often have trouble getting files from cameras, flash drives, etc. uploaded to the computer, whether it's a cord issue or a file format issue, or some other issue. Using the phone to capture and upload was seamless--another reason to justify devices in the classroom!
Editing in WeVideo on the Computer:
The most time consuming part of this task was figuring out the order in which to place my media files, adding transitions, titles, and music, and trimming videos and working on timing. WeVideo froze up a few times, which was frustrating, but the nature of the game with Web 2.0 tools.
Conclusion:
I really enjoyed this project, and it was nice to reflect back on why I entered this job in the first place. It changed my attitude a little the past week, as I thought about my original intentions. I feel blessed to be a part of education.
Getting Ready to Start my Photo Immersion Project...
Did some research, and really liked the ideas from Project Life 365.
Every day there is a theme. Today is Day 1 of my photo challenge, and the theme is #IN_THESE_SHOES.
My first Photo Entry
November 18, 2013
This theme reminded me of how I wear many "hats", but truth is, the shoes are really what defines my life. I realized this morning there are three phases of my day. I start my day at 4:30 am (when I grade papers because the house is quiet) in my favorite comfortable footwear. Then, at 6:00 am, the professional/work shoes go on, and the day begins! At 4:00 pm, I come home, change into exercise wear with my sneakers, and battle the effects of turning 40 in a few months, and then become super-mom running around to all of the kids activities. Finally, around 9:00 pm, I cycle back to the comfortable attire and my favorite shoes of the day--the same ones I wake up to, and slow down the pace of life relaxing with my family before we all wake up and do it all over again!
On Monday and
Tuesday of this week, I had the pleasure of attending a professional
development workshop with a Google Trainer.
During this time I had an opportunity to talk to several colleagues in
the high school regarding use of technology, specifically cell phones in the
classroom.
School Policy:
Our High School has an open cell phone policy, however at the Middle
Schools cell
phones are not to be used, unless granted permission from the building Principals.
I was surprised to hear the majority of high
school teachers say they like the “BYOD” (Bring Your Own Device) concept. I also learned that my counterpart at our
other Middle School, Rick Lapi, was granted permission to allow his 8th Grade Multimedia students to use their devices for a variety of other tasks. Rick and I teach the same curriculum. I decided to interview Rick, as I was curious
how our middle school age group was able to handle the responsibility of this
privilege.
Uses of Phones/Devices:
Rick said his students use a variety of devices, such as the Kindle, Galaxy, iPhone,
iPad, iPod, etc. His main purpose for using them is to gather images and
videos for a summative assessment project regarding the application of different
camera shots. He said the kids do not
typically use the phones for research, as many high school teachers do, simply
because his room is a computer lab, and the kids use the PCs for the research
component. He has also used the devices for a text survey
and classroom response system, group poling with the Cel.ly app, and surveys. Rick also has cameras in his room for the
student who do not have devices.
Parental Involvement & Feedback: As far as the parents are concerned, Rick has
never had an issue with the kids who use their own devices. He tells the kids to inform their parents
they are allowed to use devices in his class, but does not require them, so
there have been no problems. I asked if
the kids abuse the privilege, and just as the high school teachers shared, kids
know when to put them away. I feel this comes down to enforcing rules right
away at the start of the year and following through with consequences, just as
any other classroom management issue.
Technical Challenges: There were some technical challenges that
Rick encountered. The main issue in
capturing images and video was how to get the files from the phone to
computers. If kids are logged into the
phone settings under Wi-Fi as a “Guest”, they are unable to email themselves
the pictures, as our firewall won’t allow this action. Rick has cords to import the files to the computers,
but only one cord for each different type of device, so the kids have to be
patient and take turns—a challenging skill for our age group.
What Rick Learned: Rick learned that phones
can be a valuable too. The kids enjoy using them so increases engagement and
interest. He also feels if kids are allowed to use their own devices, it
can help with budget constraints, eliminating the need for cameras and school
resources for internet and research. Like all technology little issues
will pop up, and you have to be prepared for an alternative plan. Being a
computer teacher for almost two decades, Rick is used to technical issues and
problems, so this is not something that is intimidating!
What I Learned: I learned, like most things, the success of mobile devices in the classroom depends on preparation, setting rules and guidelines, enforcing rules and guidelines, and having a Plan B. I liked Rick's point about how students bringing in their own devices will directly assist in budgetary constraints. I learned my school's mindset on the BYOD concept is a positive one where students can be productive and efficient. I am now better prepared to incorporate this in my own classroom, and have some positive benefits for learning to justify it.
I chose the Web 2.0 site iPiccy from Untangling the Web by Steve Dembo and Adam Bellow. This fun and easy to use photo editing site would be perfect for my Middle School Kids. What a great site for them to upload and edit pictures, add fun features like effects and borders, and download their creations. I've used several photo editing sites before, and I was curious what iPiccy might offer that others didn't. In addition to quick editing techniques, there are more sophisticated editing tools, like curves, levels, adjustments, thresholds, color balance and filters. These are all high-level Photoshop skills my 8th graders learn using Adobe Photoshop.
There are many effects very similar to other Web 2.0 photo editing sites, such as Gritty show here.
***There is a feature that I found that I LOVE!!! It's the Skin feature where you can paint a new skin color onto a picture, such as Sunny Tan below. Changing skin color when layering multiple photos is the number one hardest thing my students struggle with in Adobe Photoshop. This paint-on skin color option is easy and works great!!!! I just gave my daughter (far right) a tan in the pic below. For this reason alone I will encourage my students to use this site!!!
Another great feature that reminds me of Adobe Photoshop is the ability to work with layers. You can add elements and every new object will remain as a separate editable layer until you choose to merge them all together. You can see the layers to the left, and how they look together in the picture to the right.
Finally, after experimenting with border and texture, it was very easy to simply save the file right to the computer. This Web 2.0 tool is extremely user-friendly. It offers tools for everyone, and even has tools for the more advanced photo editor, as mentioned above.
Another great iPiccy tool is the Vector Mask--another advanced tool available in Adobe Photoshop. Masking allows one to take part of one image, and combine it (or Layer it) with another image, so the end result looks like all layers were part of the same image in the first place! This tool, along with the ability for Layering, makes iPiccy a very versatile site.
The Collage tool in iPiccy, shown below, illustrates Masking and Layering abilities. The three images to the right were the start of my "Magazine Cover". Using the ocean as a background, and Masking Sylvester and Arnold (my husband's childhood idols), I put together a mock Magazine Cover. This Collage from iPiccy is a great way to show students the process of how several pictures can layer into one (that's my husband and daughter in the mix--they were Masked, too)!
What's great for my students is that no registration is required to use this site. What's not great is the dating website advertisement that popped up at the bottom! As with any free Web 2.0 tool, beware of the ads.
Finally, click here for a link to my 8th Grade Webpage where I used the Collage to showcase the course.
I chose Vine as a new
tool to explore from a great collection of sites at Go2Web20. I first experimented with the app on my phone. My daughter downloaded this app to use a few months ago (she doesn't have an iphone, so uses mine often for apps). I thought this would be a good staring point. All I knew about Vine was it provided laugher for my daughter and her friends as they filmed goofy short videos. Seeing how much my own 6th grader likes this app, I thought perhaps it might provide some useful purpose at school. It's very easy to use. The Menu has a Home option which will scroll through may public Vines posted by public users. Here, just like many other social networking sites, you can Like and Comment on other user's Vine videos. The menu has an Explore option to choose categories, like Comedy and Cats. The Activity option shows what has been happening on your own account, such as if someone likes your post and who is following you. And a Profile option where Settings can be managed, such as password information and how to find and connect with others. Then of course, in addition the the Menu button, there is a Record button. Here is where the fun begins. Users press a finger on the screen to record, and lifting your finger will pause the recording. Users have 6 seconds to record and pause as many times as they want. Then, you can choose whether or not to publicly post on Vine, Twitter and/or Facebook, and add a caption, location, and channel. So, I filmed a normal night in my house (video above), which in 6 seconds shows what my daughter, husband, dog and myself engage in at 8:00 (notice the only one working!).
More In Vine: What's great is the video automatically saves to your smart phone's photo library. Then you can share it multiple ways outside of the Vine App such as in an email or message. You can also film part of a Vine video, and save it to continue later. You can save up to ten sessions for later filming. You can even edit finished Vines and rearrange the order of the clips. There are more options than I expected in a 6 second production! While filming, there are also some simple filming effects, such as the Ghost effect.
Use in Teaching: I struggle with the educational value of Vine. I looked online to see how other teachers are using Vine. There is a site about how an English teacher uses Vine for Project-Basedlearning, having students pick a favorite character from Macbeth and become that character in 6
seconds. Also, a science teacher uses Vine (same link above) for lab experiments to replace lab notes. Again, I would need parent's permission to use this app, and I would also need to be sure all students had access to a device that allows for mobile apps. **Criticism: Although some educators have success using Vine, I still feel it is not the best tool for teaching. It is a social site, and the privacy factor would have to be monitored and maintained. Also, I feel the quick filming option would actually take away from the productivity factor. Even in filming a silly video, I have witnessed my daughter and her friends film 20 takes until they got the Vine they wanted. After all, you have seconds to get it right! As I explored Vine's categories, I found very little with educational value, even in the News & Politics section. Perhaps if Vine launched an educational contest, students and teachers might be more inspired to focus Vine in the classroom. In addition, just as SchoolTube is to YouTube, Vine could dedicate a special App for the classroom.
The first site I chose is from Kathy Schrok’s Guide to Everything. I decided to check out the Online Video Editors,
and picked WeVideo. I have been teaching
a video editing software program with my 8th graders for the past
two years, and we always have a variety of issues with hardware and software. Often my computers won’t detect my headphones
and microphones, the program locks up and students haven’t saved, and often the
kids don’t move files before importing them and Sony “loses” the file
connection and then the kids have to start over. The biggest issues are my
network and computers can’t handle the program.
It was explained to me in much more elaborate terms from my tech department,
but that’s the issue is simplistic terms.
Upon first looking over this site, I liked some obvious options . I liked the Cloud feature so kids can access
it anywhere, and also there will be no lost file issues. (My Sony Vegas software is only available in
my classroom and not the computer labs due to the expense of the software, so
this problem would be solved with WeVideo.)
I also really liked how WeVideo has three different options for editing—accommodating
all learning levels and allowing for differentiation. (Sony Vegas is very sophisticated. We utilize
the multiple tracks for audio and video.
The kids even create a Green Screen effect using the Chroma Keyer
Effect.) I also love the themes available
in WeVideo; another quick editing tool for kids who are just starting with the
basics and aren’t prepared for all of the effect options in Sony Vegas, and for
those who just don’t have the time to add pizzazz. I was very pleasantly surprised with all the options in WeVideo. I like how the audio and video layers
automatically add themselves as more items are imported into the timeline. If students need to quickly create a video, I
think the gallery of music and sound effects are really helpful. I was also impressed with the further editing
that can be done on the audio tracks, such as fading and controlling
volume. The recording option was so
easy, also! Photos and video could be
edited in their placement so titles can be shown on the side. We the exception
of the many effects we use in Sony Vegas, I was able to accomplish all of the
fundamental tasks and operations we use in Sony Vegas. The biggest bonus is the fact that WeVideo will not disconnect from files and kids can work on their videos anywhere they
have the internet. I also like how the
Media link keeps a collection of all media used so it is accessible later
on.
An educational complaint with this site is
the inability to download with the free version. However, you can link it, embed it, or upload to some social media. Also, students will not have the collaborative component to share for editing purposes with the free version. Other than that, this site is great for my
students and for personal use! As a Middle School teacher, I would have to get parents' permission for kids to make an account as many of my kids are still under 13. I think this would be a great classroom tool.
Check out my first creation below. It demonstrates use of multiple audio layers, recording, fading of music, importing pics, use of titles, use of effects, and transitions.
Then, I wanted to see how the mobile app for WeVideo worked, so I took some pictures and images during a trip this past weekend at a local lodge where we celebrated my daughter's birthday with friends. I learned that the only real option available on the mobile app is to upload the media files. You have to log into WeVideo on a computer to access all other editing effects and features. What's nice, however, is you can get your video started while on the go via the app, then just spruce it up later when you have time. Below is my creation.


 l
l )
)